
| Menus |
|
This section describes all the commands under the CustomMailer menus.
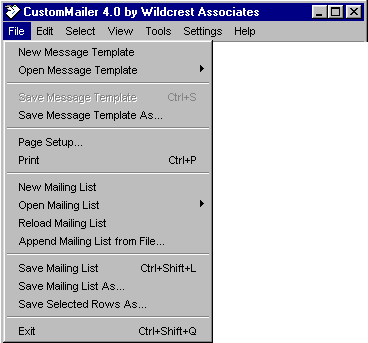
New Message Template - Lets you create a new message template within CustomMailer (you will get a warning if you are about to overwrite any unsaved changes to your current message template). You will also be asked if you wish to create plain text email message or an HTML email message.
Open Message Template - Leads to a submenu where you can select an Open Message Template command to specify a message template file name using a standard file open dialog or one of a set of previously opened message template files in a "history" list. CustomMailer will read the specified file in as your new message template (you will get a warning if you are about to overwrite any unsaved changes to your current message template). This becomes the default message template when you run CustomMailer next time and gets placed at the top of your Open Message Template file "history" list. Opening the first file in your file "history" list, which is your current (= most recently opened) message template, will cause the current contents of that file to be reread, overwriting any changes to your current message template in CustomMailer that have not be saved and picking up any changes made to your message template file by an external program. A message template file ending in .txt will be interpreted as a plain text email message, whereas a message template file ending in .htm or .html will be interpreted as an HTML mail message.
Save Message Template (Ctrl-S) - Writes out the current message template into the current (= most recently opened) message template file name. There is no overwrite confirmation. Your actual message template (in blue) is saved even if you are really viewing a customized message (in black) expanded from the message template for a given recipient.
Save Message Template As - Lets you specify a file name and writes out the current message template to the specified file. This becomes the default message template when you run CustomMailer next time and also for subsequent "Save Message Template" commands, and gets placed at the top of your Open Message Template file "history" list. Your actual message template (in blue) is saved even if you are really viewing a customized message (in black) expanded from the message template for a given recipient.
Page Setup - Brings up a dialog box where you can change printing parameters such as font, headers, footers, margins, etc.
Print (Ctrl-P) - Brings up the standard Windows print dialog and lets you print out your current message template.
New Mailing List - Lets you create a new mailing list within CustomMailer (you will get a warning if you are about to overwrite any unsaved changes to your current mailing list). A dialog will appear that lets you define (and reorder or delete) the new mailing list column names. You can later add, delete, edit, or reorder your column names using the appropriate commands under the "Edit" menu.
Open Mailing List - Leads to a submenu where you can select an Open Mailing List command to specify a mailing list file name using a standard file open dialog or one of a set of previously opened mailing list files in a "history" list, or your most recently opened database (if you have the CustomMailer Enterprise Edition). CustomMailer will read the specified file in as your new mailing list (you will get a warning if you are about to overwrite any unsaved changes to your current mailing list). This becomes the default mailing list when you run CustomMailer next time and, if a file, gets placed at the top of your Open Mailing List file "history" list. Opening the first file in your file "history" list, which is generally your current (= most recently opened) mailing list, will cause the current contents of that file to be reread, overwriting any changes to your current mailing list in CustomMailer that have not be saved and picking up any changes made to your mailing list file by an external program.
Reload Mailing List - Causes CustomMailer to re-execute your mailing list file reading or database query according to your current Preferences settings. This is useful in case you (or others) have independently changed your mailing list file or database from a different application while CustomMailer is running. Note that reloading the mailing list from the file or database will cause you to discard any changes you may have made to your mailing list inside CustomMailer using Add, Edit, Delete, or Append commands if these changes have not been saved. Also note that reloading your mailing list causes the "SendStatus" values to be reset to their original values and clears your "duplicate" information used to detect whether you've already sent to a given address.
Append Mailing List from File - Lets you add the contents of a mailing list file to the end of your current mailing list. It is not necessary that the appended file match your current mailing list in either number or order of columns. CustomMailer will attempt to match (case-insensitive) the column headings in your mailing list to column headings given in the first row of your appended file. A dialog will display each mailing list column with a popup menu showing the appended file column to be used (or "leave blank" when no matching name is found). You can use the popup menus to change the selection for any mailing list column to any column in the file (or "leave blank"). You can use using some columns more than once and others not at all.
If the first line of your appended file matches no column headings in your mailing list, it is presumed that you didn't use column headings in your appended mailing list. In that case the column headings "Column1", "Column2", etc. will be shown followed by the actual first row data value in each column so you can discern the matches for yourself. If you have additional columns in your appended file that you want added to your list, you first need to add some new columns to your mailing list using "Add Mailing List Column..." before appending the file.
After appending, the mailing list is scrolled so that the first visible line is the first line of the appended list.
Save Mailing List (Ctrl-Shift-L) - Writes out the current mailing list into the current (= most recently opened) mailing list file name. There is no overwrite confirmation.
Save Mailing List As - Lets you specify a file name and writes out the current mailing list to the specified file. This becomes the default mailing list file name when you restart CustomMailer and gets placed at the top of your Open Mailing List file "history" list. The "SendStatus" column will be included or not depending on the "Include 'SendStatus' in Save Mailing List" value in Preferences.
Save Selected Rows As - Lets you specify a file name and writes out the currently selected rows of your mailing list to the specified file. This lets you partition your mailing list into separate files based on selections you make either manually or using "Select using Filters" to test values in your mailing list or after using various commands under the "Tools" menu. The "SendStatus" column will be included or not depending on the "Include 'SendStatus' in Save Mailing List" value in Preferences.
Exit (Ctrl-Shift-Q) - Exits CustomMailer, asking you first
whether you want to save any changes you made to your current message
template and/or mailing list.
Undo (Ctrl-Z) - Invoking this menu command lets you undo the most recent change you've made either by edits in the message template or by selections (but not edits) in the mailing list, depending upon which portion of the CustomMailer window you have most recently clicked on. Only one level of undo is currently supported, so if you make a second edit or selection change, you can't back up more than one step. Rather, undo followed by another undo is a redo.
Cut (Ctrl-X) - Saves the currently selected text in any field of your message template to the system clipboard and deletes it from that field of your message template. It may later be pasted in CustomMailer or any other Windows application. Equivalently, you can perform a right mouse button click anywhere in your message to bring up a popup menu and select the Cut command for cutting the selected text to the clipboard.
Copy (Ctrl-C) - Saves the currently selected text in any field of your message template to the system clipboard but does not delete it from that field of your message template. It may later be pasted in CustomMailer or any other Windows application. Equivalently, you can perform a right mouse button click anywhere in your message to bring up a popup menu and select the Copy command for copying the selected text to the clipboard.
Paste (Ctrl-V) - Inserts the contents of your system clipboard as text at the insertion point in any field of your message template. This action may be performed repeatedly to make multiple copies of this text. Equivalently, you can perform a right mouse button click anywhere in your message to bring up a popup menu and select the Paste command for pasting the clipboard contents at the current insertion point.
Insert Tag - Displays a list of all your current tags (mailing list column headings) in a submenu. You can then select any of the available tags and that tag (along with the surrounding tag indicator characters) will be inserted into your message wherever the current insertion (caret) point is, just as if you began typing. This can be any header field or the body of the message. Equivalently, you can click in any of your message header fields, perform a right mouse button click to bring up the same Insert Tag popup menu, and select a tag for insertion at that point.
Insert Macro - Displays a list of all your current macros in a submenu. You can then select any of the available macros and that macro (along with the surrounding tag indicator characters) will be inserted into your message wherever the current insertion (caret) point is, just as if you began typing. This can be any header field or the body of the message. Equivalently, you can click in any of your message header fields, perform a right mouse button click to bring up the same Insert Macro popup menu, and select a macro for insertion at that point.
Add Mailing List Row (Ctrl-N) - Adds a new row to the end of your current mailing list. You will then see a dialog with all the (empty) mailing list fields into which you can enter your new values.
Edit Mailing List Row (Ctrl-E) - Lets you edit the individual values of a row selected in the mailing list. If more than one row is selected, the first selected row will be used. A dialog appears with all the current values which you can then edit. You can also invoke this function by double-clicking on the row in the mailing list that you would like to edit.
Delete Mailing List Row(s) (Ctrl-D) - Deletes the currently selected mailing list row or rows. If more than one row is about to be deleted, a confirmation dialog will first appear.
Restore Last Deleted Row(s) - Brings back the most recently deleted row or rows. These rows will be added to the END of your mailing list rather than into the position(s) they occupied when you deleted them. An alert dialog will appear to remind you of this.
When the mailing list is selected, CustomMailer also supports the standard keyboard clipboard commands of Cut (Ctrl-X), Copy (Ctrl-C), and Paste (Ctrl-V). Cut (Ctrl-X) is the same as Delete Mailing List Row(s), except there is no confirmation dialog if you are about to delete more than one row. Paste (Ctrl-V) is the same as Restore Last Deleted Row(s), including that the rows are pasted to the END of the list, but no alert dialog appears to remind you of this, plus you can Paste repeatedly whereas you can only Restore Last Deleted Row(s) once. These keyboard commands work only when the mailing list is selected and are independent of the Cut, Copy, and Paste menu commands described above used for moving text between message template fields and the system clipboard, which work only when message template fields are selected.
 Add Mailing List Column - Lets you
add a new mailing list column. A dialog appears allowing you to
specify the column name for the new column. Entering a duplicate
column name will be prevented. You will then be prompted
for how to define a default initial value for this column for all the
rows of the mailing list. The new values may be:
Add Mailing List Column - Lets you
add a new mailing list column. A dialog appears allowing you to
specify the column name for the new column. Entering a duplicate
column name will be prevented. You will then be prompted
for how to define a default initial value for this column for all the
rows of the mailing list. The new values may be:
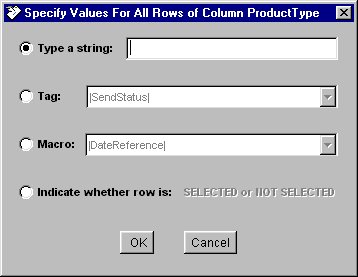
a) a
string entered by you (which may be left blank)
b)
the value of a |tag|, which will copy the values of some other existing
column,
c)
the value of a |macro|, which will be evaluated based on the other
values in each row
d)
the value SELECTED or NOT SELECTED based on whether that mailing list
row is selected.
The new column will be added to the (rightmost) end of the mailing
list. You can use Edit Mailing List Column (below) to
subsequently reorder the columns as desired.
Edit Mailing List Column - Displays a list of all the mailing
list columns which you can use to do a number of things:
1) Reorder - you can drag the names in the list to
reorder your mailing list columns
2) Rename - you can select a mailing list column and
rename it by hitting the "Rename Column" button.
3) Capitalize 1st letters - you can select a mailing
list column and hit the "Capitalize 1st Letters" button. This
will capitalize the 1st letter (only) of each word in either all the
rows or all the selected rows in this column of the mailing list.
This is useful because many customers enter fields with extra capital
letters or all lower case letters. This command will covert "JOHN
SMITH", "john smith", and
"jOHn SmiTH" to "John Smith". Because this operation is not
undoable, a confirmation dialog will first appear.
4) Set row values - you can select a mailing list
column and hit "Set Row Values" to redefine the row values in that
column
of your mailing list. You may specify the new row values using
any
of the methods a), b), c), or d) under "Add Mailing List Column"
above.
"Edit Mailing List Column..." also gives you the option to change
values
in all rows or only in the subset of rows you have selected.
Delete Mailing List Column - Displays a list of all the
mailing list columns and lets you delete any ones you select.
After you say "OK" to confirm deleting one column, the Delete Mailing
List Dialog remains on the screen so you can delete additional columns.
Select All (Ctrl-A) - Selects all recipients in the mailing list. You can then hit the "Send" button to send emails to these.
Unselect All (Ctrl-U) - Unselects all selections in the mailing list.
Invert Selections (Ctrl-I) - Changes all selected rows in the mailing list to unselected and all unselected rows to selected. You might, for example, Save Selected Rows to File, then Invert Selection, then Save Selected Rows to (a different) File to partition your mailing list into two distinct subsets.
Select using Filters (Ctrl-L) - Brings up a dialog box where
you can enter a text string, search one or all fields for the specified
string, and select or unselect all records in the mailing list which
match according to a specified test. There are 17 possible
matching functions:
| CONTAINS | DOESN'T CONTAIN | |
| EQUALS | DOESN'T EQUAL | |
| STARTS WITH | DOESN'T START WITH | |
| ENDS WITH | DOESN'T END WITH | |
| LENGTH = | LENGTH < | LENGTH > |
| DATE = | DATE < | DATE > |
| VALUE = | VALUE < | VALUE > |
 The first eight tests are string matching
tests and can be either case-sensitive or insensitive. The LENGTH
tests work on the length of the value as a string. The DATE tests
work for dates given in most short and long standard formats (e.g.
8/15/00, August 15, 2000, etc.) and use the internationalized dates,
names, and formats appropriate for your country's locale as set in the
Windows Control Panel "Regional Settings". The VALUE tests work
for either plain numbers (integers, such as 23 or -5, or non-integers,
like 5.25) or the appropriate currency for your country's locale as set
in the Windows Control Panel "Regional Settings". If a VALUE test
encounters a value that isn't a number, it substitutes 0 for the
value. If a
DATE test encounters a value that isn't a date, it substitutes the date
January 1, 1900 for the date.
The first eight tests are string matching
tests and can be either case-sensitive or insensitive. The LENGTH
tests work on the length of the value as a string. The DATE tests
work for dates given in most short and long standard formats (e.g.
8/15/00, August 15, 2000, etc.) and use the internationalized dates,
names, and formats appropriate for your country's locale as set in the
Windows Control Panel "Regional Settings". The VALUE tests work
for either plain numbers (integers, such as 23 or -5, or non-integers,
like 5.25) or the appropriate currency for your country's locale as set
in the Windows Control Panel "Regional Settings". If a VALUE test
encounters a value that isn't a number, it substitutes 0 for the
value. If a
DATE test encounters a value that isn't a date, it substitutes the date
January 1, 1900 for the date.
You can perform repeated tests to further refine your set of
selections, adding or removing selections based on a succession of
tests. You can also undo your selection changes. Hit Done
when done using the "Select
using Filters" dialog.
Select Nth Row (Ctrl-Shift-N) - Selects the nth row of the mailing list. Invoking this command brings up a simple dialog where you can enter the value "n" and hit "OK" to select this row. Rows are numbered starting with 1. Entering n that is 0 or less or greater than the number of rows will have no effect. This command was added to facilitate users using a Windows scripting solution that allows them to control CustomMailer with keyboard operations, allowing them to enter Ctrl-Shift-N, followed by the desired row number, followed by the "Enter" key which is the same as hitting the "OK" button.
 Find (Ctrl-F) - Brings up a dialog similar to
the one for Select using Filters and lets you search for mailing list
rows based on the same 17 matching functions given above. The
mailing list will start at the first selected row of the mailing list
(or the first row if none is selected)
and select the next row that matches the specified criteria, which you
can
then delete, edit, send, etc.
Find (Ctrl-F) - Brings up a dialog similar to
the one for Select using Filters and lets you search for mailing list
rows based on the same 17 matching functions given above. The
mailing list will start at the first selected row of the mailing list
(or the first row if none is selected)
and select the next row that matches the specified criteria, which you
can
then delete, edit, send, etc.
Find Again (Ctrl-G) - Used in conjunction with the Find
command, Find Again will find and select the next row in the list that
matches the same criteria. When the search gets to the end of the
mailing list, the search continues at the top of the list. When
you have made one complete pass through the mailing list since the last
Find command, you will be notified with an alert that you have gone
once around (you can continue around again if you like).
As Template - In this mode, the message template displays in blue and any changes you make will be made to the template and will therefore apply to each recipient when the message template is expanded into the actual customized message for that recipient. The changes are not written to the message template file unless you do this explicitly, but you will be given a warning if you attempt to overwrite changes in your current message template by reading in a new message template or try to exit CustomMailer without saving. The "Template" button to the left of the message body is identical in function to the View as Template menu command. If CustomMailer encounters an error when expanding a message template (e.g. macro error, tag not found, etc.), it will automatically put you into View as Template mode to let you correct the error.
As Message - In this mode, the customized message for a given recipient is displayed in black. The customized ("expanded") message is created by evaluating the tags and macros into the message template for the first recipient selected in the mailing list. If no recipient is selected, the View automatically changes to View as Template. Clicking on a recipient in the mailing list will cause CustomMailer to expand the message template for that recipient and will automatically put you into View as Message mode, unless an error is encountered. Any changes you make to the message template while in View as Message mode will be used if this message is sent to the current recipient. But since the changes are not made to the message template (in blue), they will have no permanent effect and are discarded as soon as another recipient (or even the same recipient) is selected. The "Message" button to the left of the message body is identical in function to the View as Message menu command.
Full Headers - Expands the message user interface to show the full message headers, including CC, BCC, ORGANIZATION, REPLY-TO, RETURN-TO, PRIORITY, and ATTACHMENTS.
Brief Headers - Contracts the message user interface to show only the brief message headers, specifically, TO, FROM, and SUBJECT. The other headers, even though hidden, will still be used in any messages sent.
Resize Mailing List Columns - CustomMailer will automatically resize the width of your mailing list columns so that all their values may be seen whenever a new list is read in or edited. You can use this command if at any other time you want to ensure that the mailing list columns are of sufficient size. In particular, certain long error messages that show up in the SendStatus column may not be visible unless you enlarge that column. You can also drag the line between the mailing list column headings to make the columns bigger or smaller.
Set Font Size - CustomMailer gives you some control over the
font size used in the message template and mailing list. This is
only
for display purposes inside CustomMailer to let you see more content or
make things easier for you to read and does not affect the font
size
of the message actually sent. CustomMailer does not resize
the
area of any of the text fields in the message headers, so these fonts
only
enlarge up to a certain point.
Send Log - This command will open the file SendLog.txt in
your standard .txt file reading application (usually WordPad or
NotePad), if the SendLog feature is enabled in Preferences under
Message sending.
SMTP Log - This command will open the file SMTPLog.txt in your standard .txt file reading application (usually WordPad or NotePad), if the SMTPLog feature is enabled in Preferences under Message sending.
Statistics - This command opens up a small window which will show running totals of the number and percentages of messages attempted, successfully sent, duplicates, skipped, and errors. In addition, the processing rate (attempts per hour) and send rate (successful sends per hour) are shown. These statistics are shown both for the last time the Send button was hit as well as the cumulative totals since this run of CustomMailer began. The statistics window is a floating window, so you can open it and operate the main CustomMailer window to send email, and watch the statistics update as mail is sent.
View HTML Page in Browser -
This command is enabled only if you have an HTML message. It will
open your current HTML message in your default web browser so that you
may view the message as it will actually appear. You may also
edit it using your browser editing capability, and if you save the
result under the same name as it was opened, CustomMailer will pick up
any changes when you bring the CustomMailer main window back to the
front. If you are in Template mode when you invoke this command,
you will view and edit your generic HTML template (with tags and macros
unexpanded). If you are in Message mode when you invoke this
command, you will view and edit this specific HTML message (with tags
and macros expanded for the current mailing list row only). This
menu command has exactly the same function as the "HTML Page" button to
the left of the HTML message body.
Send (Ctrl-Shift-S) - This command is exactly equivalent to hitting the "Send" button on the main CustomMailer screen. It, like the Send button, is only enabled when a recipient is selected in the mailing list and the message expands without errors. Invoking it will cause the current message to be sent for the currently selected recipient, and if the "'Send' sends to all selected addresses" option is checked in Preferences the message will be expanded and send of all the successive selected recipients in the mailing list. This command was added to facilitate users using a Windows scripting solution that allows them to control CustomMailer with keyboard operations, allowing them to enter Ctrl-Shift-S to perform the equivalent of hitting the "Send" button.
Skip (Ctrl-Shift-K) - This command is exactly equivalent to hitting the "Skip" button on the main CustomMailer screen. It, like the Skip button, is only enabled when a recipient is selected in the mailing list and the message expands without errors. Invoking it will cause the first currently selected recipient in the mailing list to be deselected and the next row of the mailing list to be selected if it is not already, causing the message to expanded and made ready for sending for this new recipient. This command was added to facilitate users using a Windows scripting solution that allows them to control CustomMailer with keyboard operations, allowing them to enter Ctrl-Shift-K to perform the equivalent of hitting the "Skip" button.
SMTP Setup Wizard - This command runs the SMTP Setup Wizard. The SMTP Setup Wizard lets you test your Internet connection to verify that it is working, find your SMTP server name if you do not know what it is, tests whether your SMTP server requires SMTP Authentication, and sends actual email to test that your SMTP server will work properly inside CustomMailer. For more details, see "SMTP Setup Wizard" in "Mailing List Tools".
Verify Addresses - This command lets you check in advance of any sending the validity of the addresses in a particular mailing list column for all (or some) of your mailing list rows. This command can greatly reduce "bounceback" messages caused by sending email to invalid Internet addresses. The address verifier first tests for legal Internet address syntax in the form username@domain.com. It then determines whether the domain (i.e., domain.com) is a valid Internet domain using the Internet DNS (Domain Name Server) protocol. Finally, it goes to the SMTP server at domain.com and asks whether username is a valid user for receiving mail at that domain (the user will not be aware of this query). Not all SMTP servers will validate user names, but you will always find out either that they are a valid user, or that they are not a valid user, or that the SMTP server won't say. In our experience, approximately 80% of invalid users or domains can be screened out using this tool. For more details, see "Verify Addresses" in "Mailing List Tools".
Find Duplicates - This command lets you check for duplicate values in any given mailing list column for all (or some) of your mailing list rows. Duplicate testing can be either case-sensitive or insensitive. This command distinguishes the first row in which a value occurs from all subsequent rows in which the same value occurs, the latter being the duplicates. It is most typically used to test for duplicate Internet addresses but also can be used to detect duplicate values of any kind (names, street addresses, order numbers, etc.). For more details, see "Find Duplicates" in "Mailing List Tools".
Match Addresses in File - This command lets you detect which rows of your mailing list contain addresses matching those found in a file. For example, this command can let you find and remove all addresses in a "remove" or "suppress" or "opt-out" list, or addresses found in a set of "bounceback" or "unsubscribe" emails, or addresses that already appear in another CustomMailer mailing list. You will first be prompted for the name of the file, which can be any file. The command will then find and extract all the addresses found anywhere in this file. The file might be just a list of addresses one per line, but it might also be another CustomMailer mailing list, or it might be a file containing all the emails you received in the last month. The file does not have to be formatted in any special way, anything that looks like a valid Internet address will be found. The command will then let you select which column of your mailing list contains addresses and which rows you want to check. It then will find all the rows matching some address found in the file versus those that do not match any address found in the file. As is proper for Internet addresses, matching is case-insensitive. For more details, see "Match Addresses in File" in "Mailing List Tools".
Extract Addresses from File - This command lets you extract
all Internet addresses found anywhere in any file and save them to
another file one per row. For example, this command can let you
quickly construct a list of addresses from a set of "subscribe" or
"opt-out" emails, postings to your web site discussion board, or an
address book from your regular email application. Though this
command only extracts a simple list of
addresses and not other useful information like names or dates, it does
provide
a quick way to create new mailing lists, "suppress" lists, etc.
For
more details, see "Extract
Addresses from File" in "Mailing List Tools".
Preferences - Select the Preferences command to bring up the Preferences dialog to view or change your Preferences settings (see "Preferences").
Macros - Select the Macros command to bring up the Macros
dialog to define rules for testing mailing list values to control
message contents (see "Tags and Macros")
Clear Duplicates Memory - When CustomMailer sends emails, the
addresses of all successful TO recipients are remembered. If the "Don't
send twice to same TO address" option is checked in Preferences, any
subsequent
message will not be sent if any of its TO addresses are in the
duplicates
list. The Clear Duplicates Memory command erases the entire
contents
of the duplicates list so that you can send to all addresses again.
Help - Brings up your default web browser in which you can view the CustomMailer Help file, which is what you are viewing now.
About CustomMailer - Brings up a dialog box where you can see
the current CustomMailer Edition and version number, a summary
CustomMailer
license agreement, and registered user information. There is a
button
for CustomMailer "Purchase & Product Information" which will show
you
detailed CustomMailer product information and let you purchase
CustomMailer
or CustomMailer upgrades on-line. There is another button for
"Update
Registration" which will let you change your registration if you
purchase
an upgrade or wish to change your name or organization (WARNING: you
must
have your serial number to re-register). The button "Resume
CustomMailer"
lets you go back to the main window of CustomMailer.
 File
File 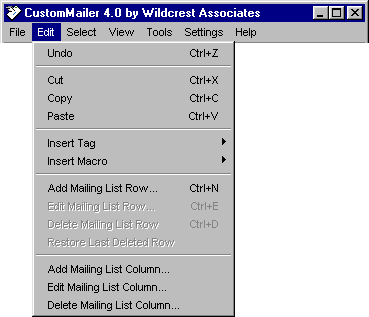 Edit
Edit 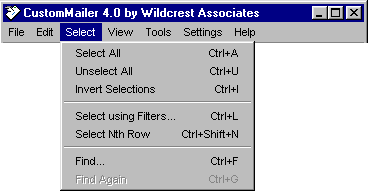 Select
 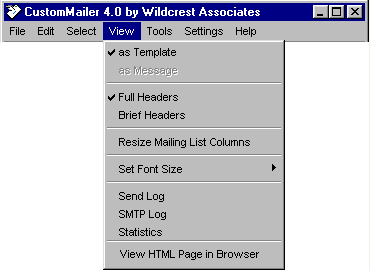 View
View 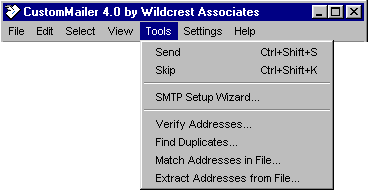 Tools
Tools 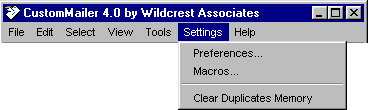 Settings
 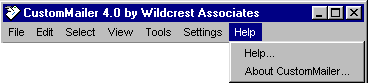 Help
Help