
| Preferences |
|
As installed, CustomMailer will start up with default settings for a number of preferences. Use the Preferences command under the Settings menu to change any of these values.
NOTE: If you are an existing CustomMailer 3.0 or 2.0 customer, then the very first time CustomMailer 4.0 runs it will automatically find and import your CustomMailer 3.0 or 2.0 Preferences and Macros, assuming you haven't uninstalled or moved your existing version of CustomMailer.
There are five categories of preferences grouped under Preferences
dialog tabs:
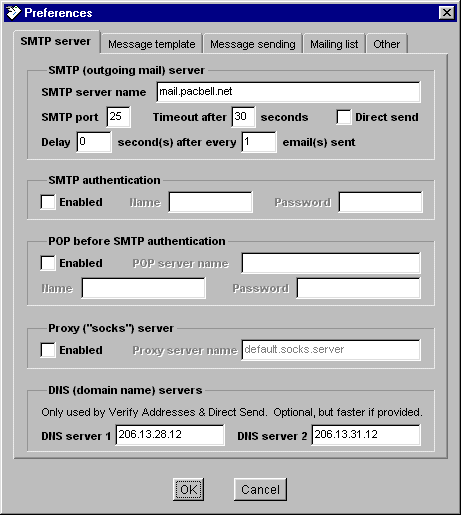
SMTP (outgoing mail) server. Enter the name of the SMTP for your company or Internet Service Provider here. The "SMTP Setup Wizard" will start up the first time you run CustomMailer to help you identify your SMTP mail server name, test that it is working, and set this value in Preferences.
NOTE: CustomMailer also allows you to enter "test" as the SMTP server. This causes CustomMailer to simulate sending email messages without actually sending any emails out. You can use this to "dry run" your use of CustomMailer before you are ready to send real email.
SMTP port: You can change the SMTP port number used to send mail. On most installations this value is the SMTP standard port number 25 and doesn't not need to be changed. However, in special situations, your network administrator may have changed the port number to a different number for security or authorization reasons. Consult your network administrator if you aren't sure.
SMTP timeout: CustomMailer will give up after this period of time in seconds if it appears you are not connected to the Internet or if your connection drops. Usually a number like 30 seconds is adequate for most installations.
Direct Send: The CustomMailer Enterprise Edition has the
ability to send email directly to your recipient's SMTP server instead
of the
conventional method of sending email to your own SMTP server which
relays
it to your recipient's SMTP server. One advantage of this is that
you can send email even if your SMTP server is down or if it is not
accessible
from your internet connection (for example, if you plug your laptop
computer
into someone else's internet connection). It is also a way to
avoid
overloading your SMTP server if you send a lot of email and it doesn't
have
enough capacity or if it places restrictions on you such as how many
emails you can send per day. The emails will also get to your
recipients
somewhat
faster since they don't have to be relayed. A disadvantage is
that
your email sending will slow down somewhat because CustomMailer has to
perform
a separate DNS lookup for each email recipient. If you use this
feature,
it is advisable to enter the local DNS servers in your Preferences (see
below) to keep from going even slower, though it will still work if you
leave these empty. Another disadvantage is that you will not be
able to send to any TO, CC, or BCC address outside of that recipient's
site,
including yourself. This is because while your SMTP server will
let
you send to anyone, someone else's SMTP server will only let you send
to
recipients at their site and will not "relay" to anyone else (including
you) for security reasons. Direct Send is therefore typically
used
with a single TO address and no CC or BCC addresses.
Delay n seconds after every m emails: Certain SMTP servers do not have the bandwidth to keep up with the large volume of messages CustomMailer can generate and will choke if messages arrive faster than they can be relayed out. If you experience this problem, you can specify a delay value and a number of messages to indicate a number of seconds CustomMailer should pause after each time it sends out that number of consecutive messages in order to throttle CustomMailer's sending rate. Most CustomMailer users should be unaffected by this problem and can set the delay value to zero.
SMTP authentication: Check the "Enabled" box if your
organization or Internet service provider requires that you use a
special name and
password to use your SMTP (outgoing) mail server. Then enter the
name and password in the fields shown. Thereafter, each time
CustomMailer
sends an email message it will encode and send your name and password
to
your SMTP server. The CustomMailer SMTP Setup Wizard will detect
whether you need to use this feature and help you set up and test the
name
and password.
NOTE: Microsoft Outlook users can also determine if
they need to use this feature by going under the Tools menu, select
"Services...", choose the "Services" tab, double-click "Internet
E-Mail", then in the "Mail Account Properties" window click on
"Servers", and in the "Login
Information" section see if a name and password appear under "Login
using:".
Microsoft Outlook Express users can go to the Tools menu, select
"Account", click on the "Mail" tab, double-click on your SMTP server,
click
on the "Servers" tab, see whether "My server requires authentication"
is
checked on the Outgoing Mail Server box, and click on "Settings" to
check
for the name and password. Netscape Messenger users can
check
under Edit: Preferences: Mail & Newsgroups: Mail Servers whether
the
field "Outgoing mail server user name" is specified (when mail is
subsequently
sent, Netscape prompts for the password).
The technical standard implemented by SMTP authentication is known as "RFC 2554". CustomMailer supports both the "LOGIN" and "PLAIN" authentication protocols. NOTE: some SMTP servers say they support SMTP authentication but don't actually require it. The SMTP Setup Wizard will let you test this possibility. In this case, you may be able to disable SMTP authentication and still send mail OK.
POP before SMTP authentication: Some SMTP servers implement a security feature known as "POP before SMTP authentication". Essentially, this means you have to read your email before you can send email. Before SMTP authentication came along, some SMTP servers used this technique to identify authorized senders since POP (mail reading) has always required a name and password, even though SMTP (send) historically did not. If you enter your POP server name, user name, and password in the fields provided, CustomMailer will use them to "read" your email automatically before you send emails. CustomMailer doesn't actually read any of your email messages but rather just logs into your POP server, which is enough to satisfy the POP before SMTP authentication protocol.
Proxy ("socks") server: Check the "Enabled" box if your organization uses a firewall and you wish to access an SMTP server outside the firewall. Enter the proxy server name in the text field (to obtain this name, ask your network administrator or use the same name used in the preferences of your browser).
DNS (domain name) servers: These are used by CustomMailer only if you use the Verify Addresses feature under the Tools menu or the Direct send feature (see above). Even in these cases the DNS names are optional, as CustomMailer will use several known public DNS servers if you don't provide any entries. However, if you provide the DNS servers local to your company (or Internet Service Provider), the Verify Addresses feature will work faster.
Your DNS servers are specified by four numbers separated by periods,
for example: 123.94.27.102. There are usually two such servers
for any Internet connection. To find out your DNS servers, you
can:
1) bring up an MS-DOS command window and enter the
command: ipconfig/all
2) under Start: Settings: Control Panel, open your
Network control panel, under Configuration select your TCP/IP component
and click on Properties, then select the DNS Configuration tab (this
exact sequence varies on different versions of Windows). Instead
of actual DNS addresses, you may have this set up to "Obtain DNS server
address automatically", in which case use method 1) above.
3) or, ask your network administrator or Internet
Service Provider.
Message template file name: At the top, this panel shows your current message template file name. This is the name of the most recently read message template file name and will be remembered and used the next time CustomMailer runs. To change this name, "Open" or "Save As" a different message template file name using the File menu.
Macros file name: This panel shows your current macros file name. This is the name of the file containing your current set of macros and is remembered and used the each time CustomMailer runs. To change this name, use "Read Macros from File" or "Write Macros to File" from the Macros dialog under the Settings menu.
Current tag indicator character: The character used before and after a name to indicate that |name| is a tag. The tag will be replaced by values in the name column of yourmailing list or based on the evaluation of a macro named name. Use two tag characters in a row to indicate that an actual tag character is to appear in your message. Tags may appear in any field of the message template including in any of the header fields.
The tag indicator character can be specified in your message
template
file using a line beginning with TAG INDICATOR:. Whenever a
message
template file with an explicit TAG INDICATOR is read, this becomes the
current
tag indicator character in Preferences. Whenever a message
template
is saved to a file, the current tag indicator character from
Preferences
is written to the file as the TAG INDICATOR. If a message
template
file is read and has no TAG INDICATOR, CustomMailer attempts to infer
the
tag indicator from the use of mailing list column names, macros, etc.
in
the message. CustomMailer will ask you if this is your intended
tag
indicator character and, if so, will use it to update the current tag
indicator
character in Preferences and add a TAG INDICATOR to your message
template
file. Otherwise, it will leave these unmodified. The
current
tag indicator character is always shown in the main window to the lower
left
of the message body area.
Wrap lines after n characters: In the body of your mail message, you only need to hit the "Enter" key to force explicit "new lines" (carriage returns) in your text such as at the start of a paragraph or to insert blank lines. In general, you should write the paragraphs of your message body without any internal "new lines" inside the paragraphs. Then, CustomMailer will perform line wrap automatically for each expanded message to the number of characters specified in this option. This is useful for email recipients whose mailers do not automatically wrap long lines. The default wrap lines width, 72, is typically safe for most email readers. Set to a very large number if you really don't want lines to automatically wrap.
NOTE: In template mode, CustomMailer will wrap lines automatically based on the current width of your CustomMailer window. This is only temporary to assist you with editing, and the actual wrap to the wrap lines width specified in this option won't (and can't) occur until all tags and macros are evaluated and the actual expanded message for each recipient is known.
An exception to the wrapping feature is that CustomMailer never
wraps
the HTML source portion of HTML mail. Wrapping is not needed
because
browsers or HTML-aware mail readers do their own wrapping of the HTML
output
after it is interpreted. Moreover, wrapping can create problems
for
the HTML, such as when the HTML has very long tags, because if they get
split
across multiple lines they will not work correctly.
Another exception to the wrapping feature is that CustomMailer will not
wrap or break a plain text (or alternate text) line that contains no
spaces. This is particularly useful if you embed long URLs
(http://www.website.com/...) containing no spaces in your email
message. Most email readers
will turn these URLs into links the recipient can click on, and if the
URL were to be broken over two lines, the second half would not be
included
and the URL wouldn't work.
Tab stops every n character: If you enter tab characters in
the body of your email message, they will be converted to some number
of spaces as part of the message expansion process prior to each
message being sent. You can use this preference to specify how far
apart the tab "stops" are
set. For example, if the tab stops are set to every 8 spaces,
then
every tab will be converted to at least one space and up to 8 spaces in
order
to reach the next multiple-of-8 character position. If you set
the
tab stop value to 0, this is taken by CustomMailer as a signal to not
expand
tabs into spaces but rather send the actual tab characters themselves
as
part of your email message. In this case it is assumed your
recipient's
mail reader will convert the tabs to some number of spaces. Note
that
in this case the CustomMailer "wrap after n characters" feature only
counts
the tab as one character, and the line may exceed n characters in the
recipient's email reader once the tabs are expanded. For this
reason, letting
CustomMailer expand the tabs and wrap the lines is recommended.
Enable |Tab| macro :Selecting this option will
cause CustomMailer to recognize a special pre-defined macro called
"Tab". Placing the |Tab| macro anywhere in your message is like typing
a tab into the message at that point (which may then be expanded into
some number of spaces, see above). The main purpose of the |Tab|
macro is to let you specify
tab characters in macro rule definitions, since it is not possible to
type
a tab character directly into a macro field because typing a tab
instead
causes the cursor to jump to the next text entry field. The
|Tab|
macro is optional because you might conceivably have a column in your
mailing
list named "Tab", which would be a conflict. Like all other
macros,
the |Tab| macro name is case-insensitive, so that |TAB|, |tab|, |Tab|,
etc.
are all recognized as representing the tab character.
Enable |NewLine| macro: Selecting this option
will cause CustomMailer to recognize a special pre-defined macro called
"NewLine". Placing the |NewLine| macro anywhere in your message is like
hitting the
"Enter" key to enter a newline character (line break) at that point in
the
message. The main purpose of the |NewLine| macro is to let you
specify
line breaks in macro rule definitions, since it is not possible to type
the
"Enter" key directly in a macro field because typing "Enter" instead is
the
same as hitting the Macro Dialog OK button. The |NewLine|
macro
is optional because you might conceivably have a column in your mailing
list named "NewLine", which would be a conflict. Like all other
macros, the |NewLine| macro name is case-insensitive, so that
|NEWLINE|, |newline|, |nEwliNE|, etc. are all recognized as
representing the "newline" character.
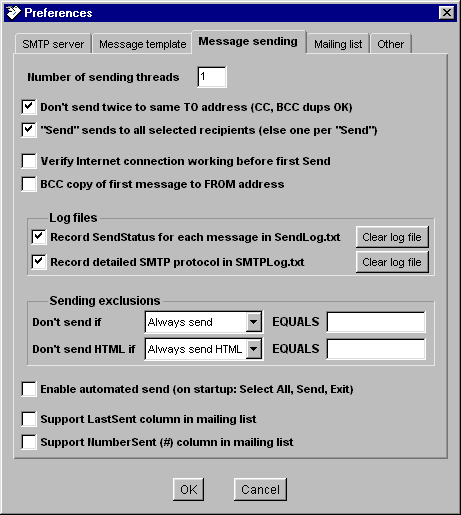 Message sending:
Don't send twice to same TO address: Checking this option means that if a message has been sent to any recipient in the TO: field any time since the current mailing list was read by CustomMailer, subsequent messages with a TO: field containing this same address will not be sent. So, for example, if you use single addresses in your TO: field, this prevents sending the same message to a given recipient more than once for this mailing list during this run of CustomMailer.
CustomMailer duplicate detection has the following characteristics:
1) Only internet addresses proper are used, i.e., you@domain.com
is extracted from addresses like "Your Name
<you@domain.com>" and used alone in determining duplicates,
so differences in the "Your Name" portion does not cause a
duplicate to be missed.
2) As with internet addresses generally, duplicate
detection is case-insensitive, so merely capitalizing some letters
doesn't cause a duplicate to be missed.
3) In a list with multiple TO: addresses separated
by commas, if any one of the TO: addresses has already received
the message, the message for this entire TO: field is not
sent, even if some of the recipients in the TO: list have not yet
received the message. In other words, every address in the TO: field
must be previously unsent for the message to be sent at all.
If the message is sent, addresses appearing in CC and BCC fields will always be sent even if they have already been sent. In addition, these CC and BCC addresses play no role in subsequent duplicate address detection. That is, an address must appear in the TO field of a previously sent message in order to count as a previously sent address.
If this option is on and a second mailing list row results in a TO: field with at least one recipient previously sent, "DUP" will appear in the "SendStatus" column.. Any operation that causes the mailing list to be read by CustomMailer will clear the "duplicates memory" (including re-reading the current mailing list when CustomMailer starts up or when you change mailing list parameters in Preferences, or if you cause a re-read of the same file using "Open Mailing List..."). There is also a "Clear Duplicates Memory" command under the "Settings" menu which has the same effect.
"Send" sends to all selected addresses: Checking this option means that when the "Send" button is pressed, CustomMailer will automatically send email to all the addresses selected in the mailing list rather than pausing after each individual email is sent. This is "fully automatic" mode. You can turn this option off to work in "semi-automatic" mode. With this option off, you can select multiple recipients in your mailing list, but then hitting "Send" will only send to the next selected recipient, allowing you to review and possibly edit each message individually before sending, but still allowing you to work down through a pre-determined set of selections.
Verify Internet connection working before first Send: Checking this box will cause CustomMailer to automatically check whether your Internet connect is working the very first time you hit the "Send" button after starting CustomMailer. This takes only a few seconds and is a useful reminder especially for users with intermittent connections such as a dial-up line. If your Internet connection is not working, you will first see a dialog suggesting there may be a problem and then after a minute or so confirmation that the connection isn't working. In this case, reestablish your Internet connection under Windows, then try "Send" again. The SMTP Setup Wizard will also help you test whether your Internet connection is working.
BCC copy of first message to FROM address: Checking this option will cause the FROM address (presumably your own address) to be added to the BCC field for the message sent to the first recipient in a mass mailing. This allows you to conveniently send one representative copy of the message to yourself to keep for your records. Changing the message template in any way will cause another first copy of this (new) message to be BCC'd to the FROM address.
Record SendStatus for each message in SendLog.txt: If this box is checked, CustomMailer records the time and SendStatus value (success or error message) of each sent email in a log file. The log file also records the line numbers of any mailing list lines that were shorter or longer than expected (see "Mailing List in a File"). It also records a summary of the results of a "Verify Addresses" command. The log file can be viewed by selecting "Send Log" under the "View" menu. The log file is SendLog.txt in the CustomMailerApp folder and can also be read by any ordinary text file reading application such as Notepad or Wordpad. The Send Log file can get large after many mailings have been performed, so hitting the "Clear log file" button will erase the contents of the log file.
Record detailed SMTP protocol in SMTPLog.txt: If this box is checked, CustomMailer records the SMTP protocol transactions between CustomMailer and your SMTP server for each message. This is useful for more technical users, enabling them to dig through the details in the SMTPLog file and potentially discover the cause of a mail sending problem. The log file can be viewed by selecting "SMTP Log" under the "View" menu. The log file is SMTPLog.txt in the CustomMailerApp folder and can also be read by any ordinary text file reading application such as Notepad or Wordpad. The log file can get very large after a number mailings have been performed, so hitting the "Clear log file" button will erase the contents of the log file. In addition, each time CustomMailer starts up, if the file is longer than 300K, all the log data other than from the immediately previous run of CustomMailer is discarded. Most users leave this option unchecked unless they are diagnosing a problem sending mail.
Sending exclusion - Don't send if: This features allows you to use a tag or macro to control whether to send email to a given recipient. The popup menu lets you choose "Always send", in which case all selected mailing list rows will be sent. Otherwise, you can choose any tag (mailing list column name) or macro and specify a value for it to EQUAL. In this case, as CustomMailer attempts to send each selected row in your mailing list, it first evaluates the tag or macro for that recipient and determines if the resulting value is EQUAL to the value you specify (this test is case-sensitive). If so, the email is not sent for that row, otherwise it is sent. This feature is useful for disabling rows in your mailing list, for example by adding a column called "Inactive" and inserting a "Y" for users who should no longer receive email without needing to remove them from the list.
Sending exclusion - Don't send HTML if: This features allows
you to use a tag or macro to control whether to send HTML mail or plain
text mail to a given recipient. The popup menu lets you choose
"Always send HTML", in which case all selected mailing list rows will
be sent HTML email (including the Alternate Text). Otherwise, you
can choose any tag (mailing list column name) or macro and specify a
value for it to EQUAL. In this case, as CustomMailer attempts to
send each selected row
in your mailing list, it first evaluates the tag or macro for that
recipient and determines if the resulting value is EQUAL to the value
you specify
(this test is case-sensitive). If so, only the Alternate Text
portion
of your email is sent as a plain text message for that row, otherwise
the
HTML is sent (including the Alternate Text). This feature is useful for
distinguishing which users prefer to receive HTML mail vs. plain text
email,
for example by adding a column called "HTML" and inserting a "N" for
users
who should only receive plain text email.
Enable automated send: Checking this box enables the automated send feature of CustomMailer to allow for unattended operation, such as by a Windows "Scheduled Task" in the wee hours of the morning. This feature enables a very specific set of events. With this option enabled, each time CustomMailer runs, an Automated Send Enabled dialog window will come up (which gives you 60 seconds to cancel if you are present and wish to change your mind), then CustomMailer will "Select All" recipients in the mailing list, hit "Send" to begin sending email to all the recipients, and then "Exit" to quit CustomMailer, all with no intervention by the user. For more details, see the chapter "Automated Send".
Support LastSent column in mailing list: Checking this box causes a new column labeled "LastSent" to be added to your mailing list. Every time a message is sent for a given line of the mailing list, today's date will be entered into this column for this row. This allows you to keep a record of the last time email was sent to each recipient. Used in conjunction with the CustomMailer's DATE selection and sorting support, this feature allows you to do things like only send to recipients who haven't received a mailing in the past month.
Support NumberSent column in mailing list: Checking this box
causes a new column labeled "#" to be added to your mailing list.
Every time a message is sent for a given line of the mailing list, the
value in this column will be incremented by one for this mailing list
row. This allows you to keep a record of the total number of
times email was sent to each recipient for this mailing list.
Used in conjunction with the CustomMailer VALUE selection and sorting
support, this feature allows you to do things like only send to
recipients who haven't received more than a certain number of messages.
File vs. Database: The overall choice of File or
Database determines whether, upon startup, CustomMailer reads its
mailing list from the most recent file or the database indicated in the
rest of this panel. The Database option is only supported in the
CustomMailer Enterprise Edition. This option automatically
changes to "File"
if you perform an "Open Mailing List" menu command and specify a file
or to "Database" if you perform an "Open Mail List" menu command and
choose the database entry from the "history" list.
File-specific options:
Mailing list file: This panel shows the name of the file from which a mailing list was most recently read.
Field delimiter: Choose space, tab, or comma as the character that separates fields (columns) in your file-based mailing list. Unless you have reason to do otherwise, we recommend using tab as your mailing list field delimiter.
Use first line as column names: Checking this item means
that the first line will be interpreted as the column names for your
mailing list. This feature is the same as that generally
supported in spreadsheets such as Microsoft Excel. Unchecking
this option means that all rows
of your mailing list will be interpreted as data and column names
"Column1", "Column2", etc. will be used instead. The number of
fields in the first line of your mailing list file will determine the
number of columns in your mailing list, regardless of the setting of
this option. CustomMailer will guess whether the first line of
your mailing list file contains column names or the first line of
actual data and present you with the option
to change this in Preferences if different than the current
setting.
The guess is based on whether the first line of the file contains a
legal
Internet email address.
.
Successive delimiters count as one: Checking this option
means that multiple adjacent field delimiters will count as one in
separating fields of each record (in which case "empty" fields will not
be possible). This option is usually turned off when using
spreadsheets such as Microsoft Excel which generally export
tab-delimited records with fields separated by single delimiters (i.e.,
two successive delimiters indicate an empty field).
Database-specific options:
Database driver: To use a database for your mailing list, enter the database driver name. Since most databases come with an ODBC driver for Windows, you can almost always use the value sun.jdbc.odbc.JdbcOdbcDriver in this field.
Data source name/URL: Enter the "DSN" for your database, either local or remote, e.g., as indicated in the Windows ODBC Control Panel. Example: jdbc:odbc:Northwind
Username: Enter your log-in name for the database. Example: dba
Password: Enter your log-in password for the database: Example: sql
SQL query: Enter your SQL ("select") command to
retrieve
your database data. The appropriate database table will
automatically
be used to specify the column names and read the data.
Examples:
select * from customers
select * from customers
where Country="USA"
select * from customers
where Country="USA" order by ContactName
Options common to both file and database:
Autoload mailing list on startup: Normally, with this
box checked, CustomMailer will automatically reopen the mailing list or
database being used at the end of the last run. However, for very
large files or databases, reading the mailing list can take a while,
forcing you to wait even if you expect to switch to a different mailing
list. Unchecking this option means that CustomMailer will not
automatically read in your most recent mailing list upon startup.
You can then use the New Mailing List or Open Mailing List menu
commands to specify your desired mailing list. If you really want
to read the mailing list from your most recently used file or database,
just use the menu command Reload Mailing List.
Include "SendStatus" in Save Mailing List to File: When you perform the menu command "Save Mailing List to File", if this option is checked, CustomMailer will write the contents of the "SendStatus" column along with the other regular data columns of the mailing list to the file. If this option is not checked, the "SendStatus" column will not be included. Writing the "SendStatus" values to the mailing list can be useful for recording which items were and were not sent (this information is also written to the Log file; alternatively the LastSent and NumberSent columns may provide the information you need).
If your mailing list did not initially have a first column labeled "SendStatus", this operation adds a "SendStatus" column to the front of the mailing list. Thereafter, when this mailing list is read in (or Appended), this "SendStatus" data will read back into the "SendStatus" column. Subsequent "Save Mailing List to File" commands will simply write out the latest "SendStatus" data, replacing any previous "SendStatus" data. Thus, only one "SendStatus" column is recognized using that exact name. If you rename the "SendStatus" column to a different name (for example, to include today's date), a new "SendStatus" column will be added to your mailing list and your renamed "SendStatus" now becomes officially part of your mailing list. This is another way to cause a snapshot of the "SendStatus" values to be preserved as a permanent record of the mailing session it was for.
Remove extra Excel/Access quotes: This feature helps
you
work more easily with mailing lists read from Microsoft Excel or
Microsoft
Access. When these applications save mailing lists as
tab-delimited
or comma-separated value files, they put quotation marks around some or
all
of the text fields. Access will put quotes around all of the text
fields,
whereas Excel puts quotes around those text fields that contain
punctuation
such as comma, colon, and semi-colon as well as other special
characters.
In addition, both applications will replace each actual quotation
mark
with a pair of quotation marks. As convenience, CustomMailer
provides
this option to automatically remove the outer quotation marks and the
extra
doubled-up quotation marks when your mailing list is read in.
NOTE:: These quotation marks are NOT restored if you save
your
CustomMailer mailing list back into a file. However, if you
specify
tab as your field delimiter in CustomMailer and make sure you have no
tabs
in your data fields (use CustomMailer's |Tab| macro feature if
you
need a tab, see above), then any mailing list file you save can
generally
be imported properly by Excel and Access.
The "Other" Preferences tab contains certain user interface controls and other miscellaneous features.
Enable sounds: Checking this box causes CustomMailer to play various alert sounds during the course of running CustomMailer. For example, one useful sound CustomMailer plays is a musical notification sound when it completes a run of sending more than 50 names. This is so you can initiate a "Send" operation, then go about your other work and be alerted when CustomMailer is done. You can turn "Enable sounds" off if you want CustomMailer to perform silently. Also, some Windows systems do not have sound cards and the playing of sounds causes a "no audio device" error window to display when exiting CustomMailer. Turning of "Enable sounds" will eliminate this problem.
Display font size: This option lets you specify the display size of the message and mailing list in CustomMailer. It is identical to the "Set Font Size" command under the "View" menu. You may wish to use a smaller font to make more of a message or mailing list visible on your screen or a larger font for easier viewing. This font size change affects only the CustomMailer display and has no impact on the size of fonts in the actual email message sent and received. The only way to control the size of fonts as seen by the recipients of your email messages is to use HTML mail.
Remember n files in Open menus: This value controls the number of previously opened files remembered and displayed in the Open Message Template and Open Mailing List menus "history" feature. The default is 5 and minimum value is 1.
Create CustomMailerDiagnostic file: Clicking on this button will create a special file called "CustomMailerDiagnostic" file. This file contains an encoded version of the internal state of CustomMailer at the exact time you click on the button. If you send this file to us (click on "Contact Us" at http://www.wildcrest.com) along with a note of explanation, we may be able to help you sort out any difficulties you have in setting up or using CustomMailer. Generally speaking, if you are having a problem, run CustomMailer until the program is in the state best showing the problem, then click on this button. We cannot guarantee that we will be able to resolve your difficulties using the information in this file, but it will improve our odds considerably.
NOTE: Wildcrest Associates respects your privacy and stipulates that any internal information (such as names, addresses, etc.) included in the CustomMailerDiagnostic file will be kept confidential by Wildcrest Associates, will only be used for these diagnostic purposes, and will be discarded as soon as your problem is resolved. Also, we will not send emails to any of these names or addresses as part of our testing.
----
When you are done changing Preferences:
Click OK when you are done changing your Preferences. If you
click Cancel, none of your changes will take effect. If and only
if
you make changes affecting the mailing list (e.g., field delimiter,
database SQL query), then the mailing list will be reread.
Similarly, if and only if you change preferences affecting the message
template (e.g., tag indicator character), then the message template
will be reread.
The complete set of Preferences are stored in the file CustomMailerPreferences.txt in your CustomMailer 4.0\CustomMailerApp folder. This file is human-readable and editable in an ordinary text editor or word processor. You can examine this file and discover all the preferences which can be set using the Preferences dialog inside CustomMailer, plus a few additional "hidden" preferences used by CustomMailer which you may also modify but which do not have a user interface within CustomMailer Preferences and are not ordinarily modified by end users.
The syntax of all preferences in this file is the same: a case-specific name followed by an equal sign followed by the value. Comment lines beginning with a pound sign (#) in column 1 are ignored. Values may appear in any order. Any values missing will be replaced by their default values within CustomMailer. Any extra values not recognized by CustomMailer will be ignored. Any time you change any preference within CustomMailer, this file is completely rewritten with the current complete set of preferences in a standard order and two comment lines at the top, replacing the previous contents.
The primary motivation for having an Editable Preferences file is so
you can start up CustomMailer with different Preferences files using
the command line startup file feature (see next), which is of
particular use with
Automated Send.
If you invoke CustomMailer from an MS-DOS command line (or .bat
file), you can specify any Preferences file of your choosing as an
argument,
for example:
C:\>cd "Program Files\CustomMailer
4.0\CustomMailerApp"
C:\>CustomMailer yourPreferences.txt
In this case, these preferences will be read in and used for this run
of CustomMailer instead of the default CustomMailerPreferences.txt
file in the CustomMailer 4.0\CustomMailerApp folder.
Any changes you make to Preferences values during this run of
CustomMailer
will be saved back out to your specified Preferences Startup file, not
to the default Preferences file. The next time you run
CustomMailer,
either interactively or using a command line on which you haven't
specified
a Preferences Startup file, CustomMailer will revert to using the
default CustomMailerPreferences.txt file.
Note that the Preferences file contains not only all your usual Preferences but also your Message Template file directory and name, your Mailing List file directory and name (or database access information), and your Macros file directory and name. Thus, the Preferences Startup file can be thought of as a "Project" file which completely describes everything that will be needed to control this run of CustomMailer.
If you set the value of the preference automatedSendOnStartupEnabled
to true, then invoking CustomMailer on the command line with
your Preferences Startup file will cause CustomMailer to read in your
specified message template, mailing list, macros, and preferences, then
Select All, Send, and Exit. This constitutes a completely
self-contained
run of CustomMailer, suitable for unattended, automated invocation as,
for
example, a Windows Scheduled Task (see "Using Automated Send").
 SMTP
server:
SMTP
server: 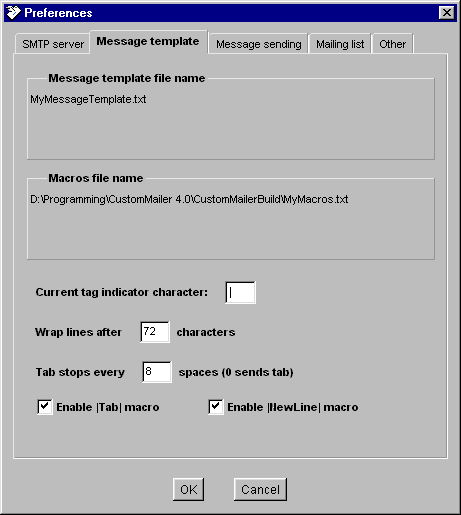 Message template:
 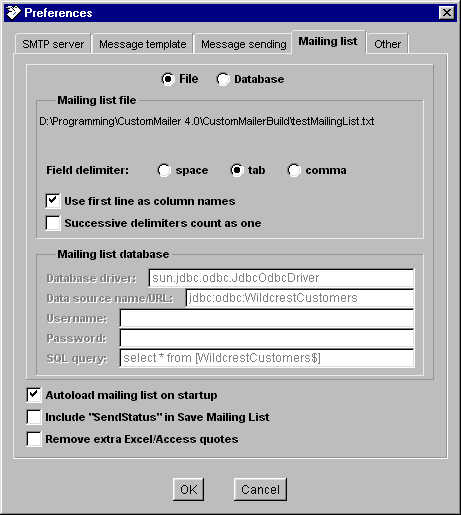 Mailing list:
 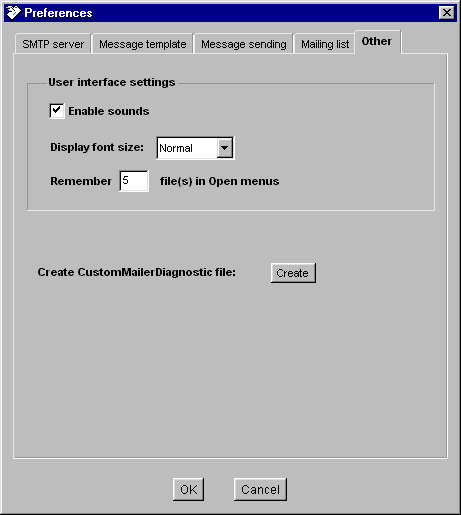 Other: